Z4K Deployment
Perform the procedures in the following order:
- Prepare Helm
- Obtain the Image Pull Key Secret
- Configure the Ingress Controller
- Install the Zerto for Kubernetes Components
- Install Zerto for Kubernetes
- Install Zerto Kubernetes Manager
- Create the Initial Access Token from Keycloak
- Install Zerto Kubernetes Manager Proxy
- Install Z4K on Openshift
- Install Z4K on OpenShift on Additional cluster
- Download the Zerto Operations Help Utility
- Update Z4K with a new Zerto License
- Upgrade Zerto for Kubernetes
- Upgrade ZKM site
- Upgrade Zerto Kubernetes Manager Proxy
- Uninstall Zerto for Kubernetes
- Uninstall Zerto Kubernetes Manager Proxy
- Uninstall ZKM site
Prepare Helm
On the Kubernetes platform, enter the following commands:
Note: Helm name (in the example above, zerto-z4k) should be a logical name entered by the user.
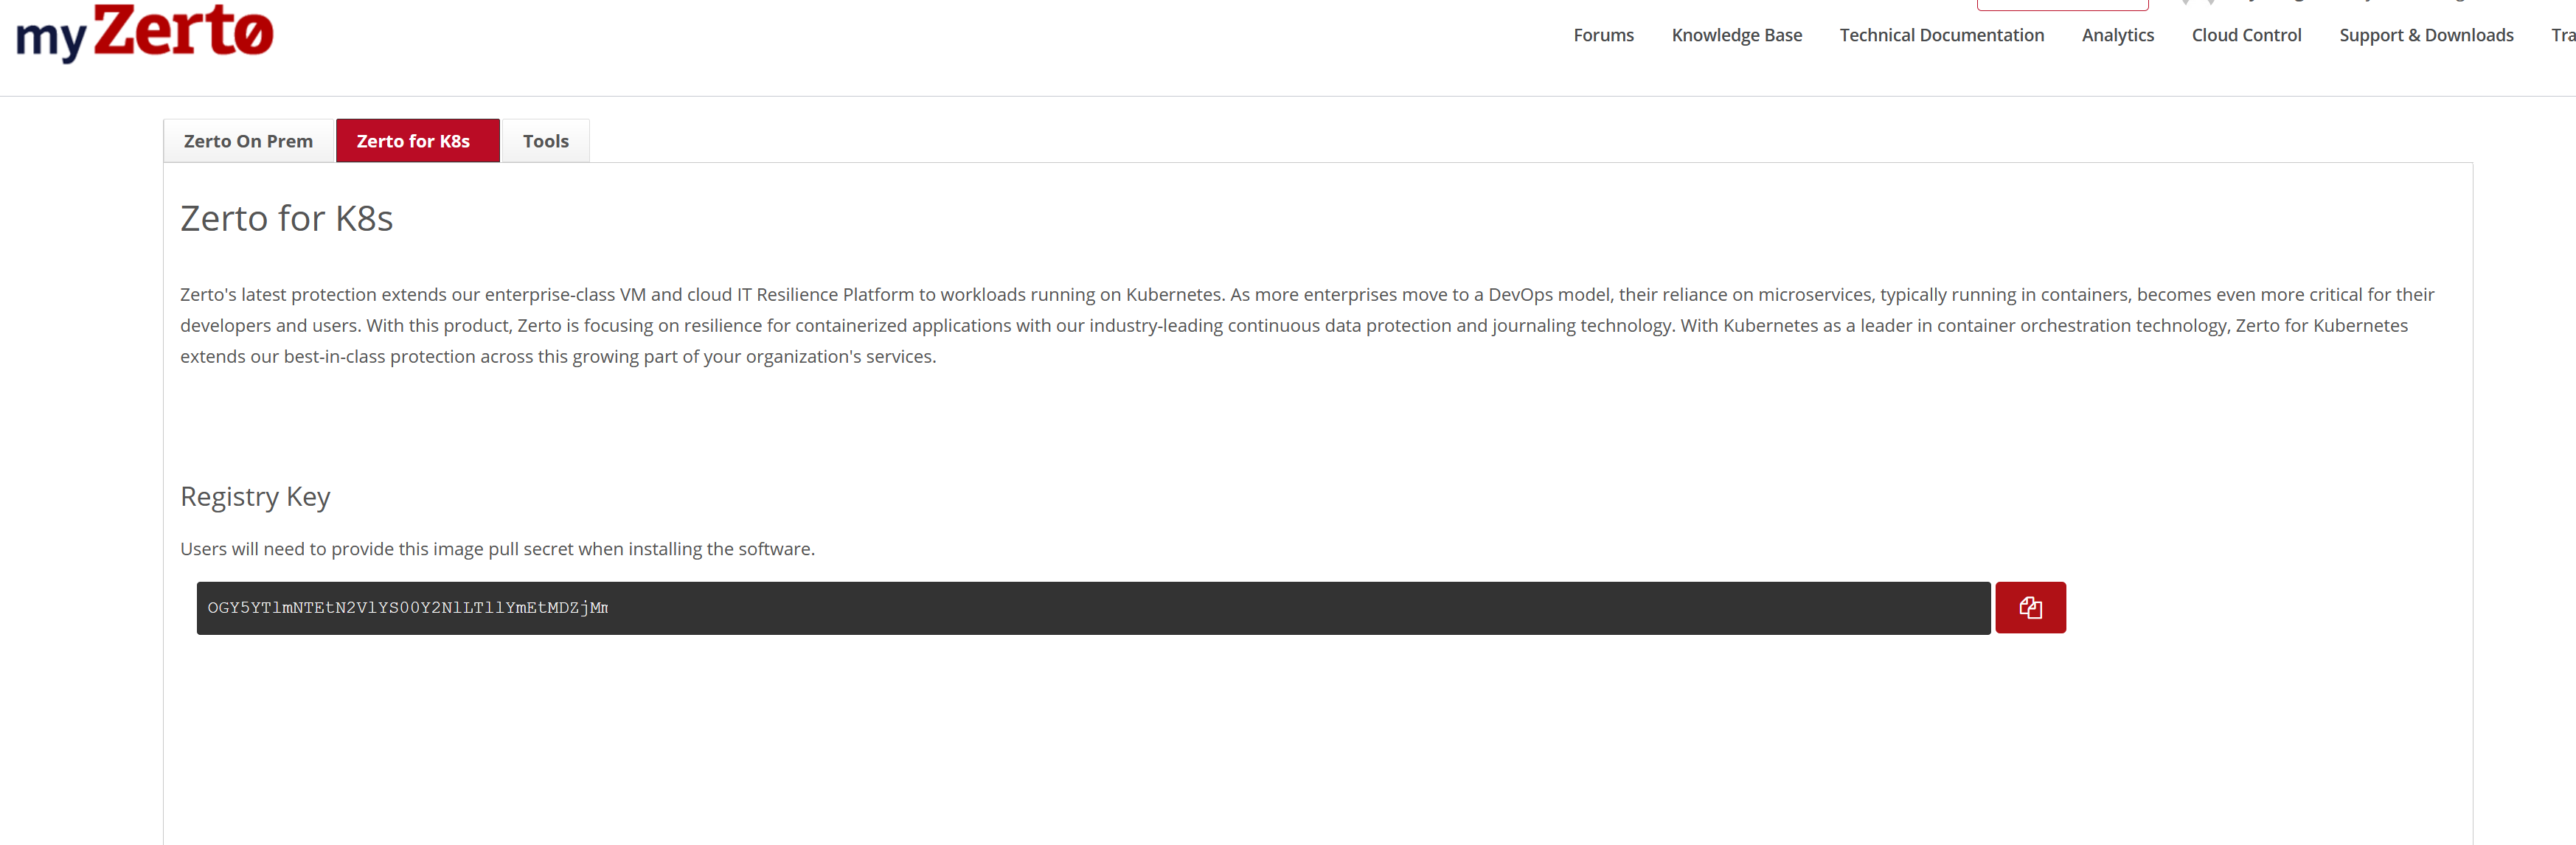
Obtain the Image Pull Key Secret
- Go to myZerto.
- If required, log in using your myZerto credentials.
- Navigate to Support & Downloads > Software Downloads > Zerto for K8s, and click Generate Registry Key.
- Copy the Registry Key. You will need it later when installing the Zerto software.
Configure the Ingress Controller
To configure the ingress controller with static IP, set the following flags in the value.yaml file as input for HELM during the installation:
For ZKM
For ZKM-PX onlyInstall Zerto for Kubernetes Components
Installation includes installation of the following components:
- Zerto for Kubernetes (Z4K)
- Zerto Kubernetes Manager (ZKM)
- Zerto Kubernetes Manager Proxy (ZKM-PX)
Install Zerto for Kubernetes
Use either of these options to install Zerto for Kubernetes (Z4K) on any of the Zerto supported Kubernetes platforms.
Note: For both options you can add the following flag to capture helm install logs for debugging and troubleshotting purposes:
--debug > <path_to_file>.txt
    ```</span>


##### Install Z4K Option 1

Enter the following command, replacing the "$" variables with values relevant to your deployment.
``` shell
helm install <installation names> zerto-z4k/z4k \
--set global.imagePullSecret=$IMAGE_PULL_KEY \
--set global.authentication.managementUser=$KEYCLOAK_USER
--set global.authentication.managementPassword=$KEYCLOAK_PASSWORD
--set global.authentication.adminUser=$ADMIN_USER
--set global.authentication.adminPassword=$ADMIN_PASSWORD
--set zkm-px.config.siteId=$SITE \
--namespace $NAMESPACE
Install Z4K Option 2
- Create the following values.yaml:
- Install using the following command: Where,
| Parameter | Description |
|---|---|
| <installation names> | Specify an easy to recognize name. |
| $NAMESPACE | A dedicated Zerto namespace. Zerto recommends using the namespace 'zerto'. |
| $SITE | A unique site name. |
Note: The <installation name> must consist of lower case alphanumeric characters or '-', and must start and end with an alphanumeric character (e.g. 'my-name', or '123-abc', regex used for validation is 'a-z0-9?').
Install Zerto Kubernetes Manager
Use one of these options to install the Zerto Kubernetes Manager (ZKM) on any of the Zerto supported Kubernetes platforms.
Install ZKM Option 1
Enter the following commands:
helm install <installation name> zerto/zkm \
--set global.imagePullSecret=$IMAGE_PULL_KEY \
--set global.authentication.managementUser=$KEYCLOAK_USER
--set global.authentication.managementPassword =$KEYCLOAK_PASSWORD
--set global.authentication.adminUser =$ADMIN_USER
--set global.authentication.adminPassword =$ADMIN_PASSWORD
--namespace $NAMESPACE
Where,
| Parameter | Description |
|---|---|
| <installation names> | Specify an easy to recognize name. |
| $NAMESPACE | A dedicated Zerto namespace. We recommend using the namespace zerto. |
Install ZKM Option 2
-
Create the following values.yaml:
-
Install using the following command:
Create the Initial Access Token using Keycloak
KeyCloak is installed during the ZKM installation. Before you can begin to install Zerto Kubernetes Manager Proxy (ZKM-PX) on additional Kubernetes clusters, you must create an initial access token using Keycloak.
Use one of the following processes depending on where you have or have not enabled two-factor authentication (2FA) for the Keycloak management user.
If 2FA is Enabled for Keycloak Management User
Use this option to create the initial access token if two-factor authentication (2FA) is enabled for the Keycloak management user.
- Edit your hosts file so that zkm.z4k.zerto.com points to your load balancer address.
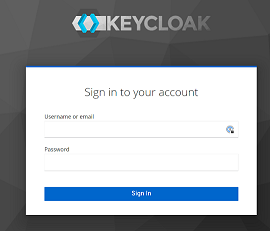
- Browse to Keycloak: https://zkm.z4k.zerto.com/auth
- Log in to the Administration Console using your $KEYCLOAK_USER and $KEYCLOAK_PASSWORD.
- Log in to Keycloak.
- Select the Realm Settings option from the drop-down menu, and in the right pane, select the Client Registration Policies tab.
- Click Create.

- In the Add Initial Access Token panel, in the Expiration field define time-frame within which the token will expire in Seconds/Minutes/Hours/Days.
- In the Count field, define the token usage count.
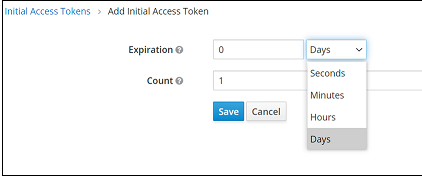
- Click Save to generate and display a token.
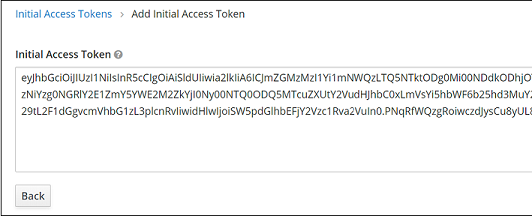
- Save the token.
- Click Back to return to Keycloak.
If 2FA is Disabled for Keycloak Management User
Use this option to create the initial access token only if 2FA is disabled for the Keycloak management user.
- Generate an initial access token via REST commands to Keycloak.
- Download and execute the following script:
Note**: The URL should end with /auth
wget https://z4k.zerto.com/generate_initial_access_token.bash
chmod +x generate_initial_access_token.bash
./generate_initial_access_token.bash
Install Zerto Kubernetes Manager Proxy
- Create the initial access token using keycloak
- Install Zerto Kubernetes Manager Proxy (ZKM-PX) on any of the Zerto supported Kubernetes platforms using one of the following options.
Install ZKM-PX Option 1
Enter the following commands to install Zerto Kubernetes Manager Proxy:
helm install <installation name> zerto-4k/zkm-px \
--set global.imagePullSecret=$IMAGE_PULL_KEY \
--set global.authentication.initialAccessToken =$INITINAL_ACCESS_TOKEN
--set config.siteId=$SITE \
--set config.zkmUrl=$ZKM_URL \
--set config.zkeycloakUrl=$ZKEYCLOAK_URL \
--namespace $NAMESPACE
| Parameter | Description |
|---|---|
| <installation names> | Specify an easy to recognize name. |
| $SITE | A unique site name. |
| $ZKM_URL | URL for ZKM. Typically: "https:// |
| $ZKEYCLOAK _URL | URL for Keycloak. Typically: https:// |
Install ZKM-PX Option 2
- Create the following values.yaml:
---
config:
  siteId: $SITE
  zkeycloakUrl: $ZKEYCLOAK_URL
  zkmUrl: $ZKM_URL
global:
  authentication:
    imagePullSecret: $IMAGE_PULL_KEY
    initialAccessToken: $INITIAL_ACCESS_TOKEN
-
Install ZKM-PX using the command:
Where,
| Parameter | Description |
|---|---|
| <installation names> | Specify an easy to recognize name. |
| $NAMESPACE | A dedicated Zerto namespace. We recommend using the namespace zerto. |
Install Z4K on OpenShift
In OpenShift on VMware platforms, Zerto does not deploy its own ingress controller but rather utilizes the built-in routes. Therefore, to enable VRA communication, you must disable ingress deployment and provide the external IP of the sites.
To disable ingress deployment and provide the external IP of the sites enter the following commands:
--set zkm.zkmIngressControllerEnabled=false
--set zkm-px.zkmProxyIngressControllerEnabled=false
--set zkm-px.config.externalIp=$SITE_IP
--set zkm.useNginxRoutePath=false
Set Custom Ingress Class Names
To find the default ingress class name, run the command:
kubectl get ingressclass
Use the following flags to specify the used IngressClassNames:
helm install z4k zerto-z4k/z4k \
--set zkm-px.image.zkmPxRepository=zapps-registry.zerto.com/z4k/stable/zkm-px \
--set zkm-px.image.flowsRepository: zapps-registry.zerto.com/z4k/stable/zkm-installer-flows \
--set zkm-px.config.siteId: $SITE \
--set zkm.image.zkmRepository=zapps-registry.zerto.com/z4k/stable/zkm \
--set zkm.image.coreRepository=zapps-registry.zerto.com/z4k/stable/zkm-core \
--set zkm.client.licenseKey: $LICENSEKEY
--set global.authentication.managementUser=$KEYCLOAK_USER \
--set global.authentication.managementPassword=$KEYCLOAK_PASSWORD \
--set global.authentication.adminUser=$ADMIN_USER \
--set global.authentication.adminPassword=$ADMIN_PASSWORD \
--set global.imagePullSecret=$IMAGEPULLSECRET \
--set zkm.zkmIngressControllerEnabled=false \
--set zkm-px.zkmProxyIngressControllerEnabled=false \
--set zkm-px.config.externalIp=$EXTERNALIP \
--set zkm.useNginxRoutePath=false \
--set zkm-px.vras.ingressClass=$INGRESSCLASSNAMES \
--set zkm-px.ingress-nginx.controller.ingressClass=$INGRESSCLASSNAMES \
--set zkm.ingress-nginx.controller.ingressClass=$INGRESSCLASSNAMES \
--set zkm.ingress.annotations.kubernetes\\.io/ingress\\.class=$INGRESSCLASSNAMES \
--set zkm.zkeycloak.ingress.annotations.kubernetes\\.io/ingress\\.class=$INGRESSCLASSNAMES \
--namespace $NAMESPACE
Install Z4K on OpenShift on an Additional Cluster
helm install z4k zerto-z4k/zkm-px \
--set global.authentication.initialAccessToken=$INITIALACCESSTOKEN \
--set global.imagePullSecret=$IMAGEPULLSECRET \
--set config.siteId=$SITE \
--set config.zkmUrl=$ZKMURL \
--set config.zkeycloakUrl=$ZKEYCLOAKURL
--set zkmProxyIngressControllerEnabled=false \
--set vras.ingressClass=$INGRESSCLASSNAMES \
--set ingress-nginx.controller.ingressClass=$INGRESSCLASSNAMES \
--set config.externalIp=$externalIp --namespace $NAMESPACE
Download the Zerto Operations Help Utility
- Download the Help Utility so you can enter Zerto operations commands. This is a bash script wrapper for the kubectl API extension.
- To use the Help Utility, first download then run the command:
kubectl-zrt - To run Zerto operation commands, on the Kubernetes platform enter the following commands:
Note: If kubectl-zrt is not installed in /usr/bin, you must point to the relevant location.
-
To view all Zerto commands, run
kubectl-zrt –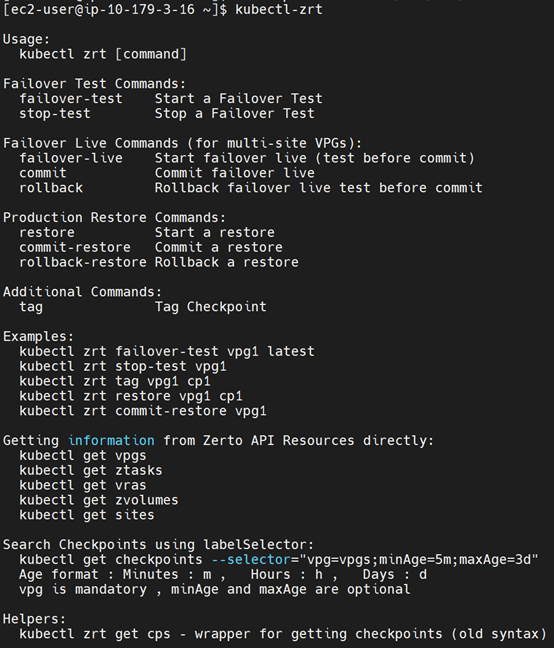
Update Z4K with a New Zerto License
To update Z4K with a new Zerto license, run the following command with the relevant environment variables:
To verify the new license has been succesfully updated, run the following command and go to the deployemnt description under the Environment variable LICENSE_KEY:
Upgrading Z4K
To upgrade the Z4K solution you must first upgrade the Zerto Kubernetes Managment (ZKM) site and then upgrade the Zerto Kubernetes Manager Proxy (ZKM-PX) site.
Upgrade ZKM Site
Use the following commands to get the release name and then upgrade.
➜**>helm list -n <namespace>**
NAME            NAMESPACE       REVISION        UPDATED                                 STATUS          CHART                   APP VERSION
<release name>  <namespace>     1               2022-09-07 09:16:04.896907435 +0300 IDT deployed        zkm-px-2.4.18+538       2.4.18+538

➜**>helm upgrade <release-name> <helm repository> -n <namespace>**

At the end you will recieve the following message:
Release "<release name>" has been upgraded. Happy Helming!
NAME: <release name>
LAST DEPLOYED: Wed Sep  7 09:26:31 2022
NAMESPACE: <namespace>
STATUS: deployed
REVISION: <revision number>
NOTES:
See the installed app by running these command:
kubectl get deployments -n <namespace>
Upgrade ZKM-PX
Upgrade the ZKM-PX site after upgrading the ZKM site using the same commands to get the release name and then upgrade.
➜**>helm list -n <namespace>**
NAME            NAMESPACE       REVISION        UPDATED                                 STATUS          CHART                   APP VERSION
<release name>  <namespace>     1               2022-09-07 09:16:04.896907435 +0300 IDT deployed        zkm-px-2.4.18+538       2.4.18+538

➜**>helm upgrade <release-name> <helm repository> -n <namespace>**

At the end you will recieve the following message:
Release "<release name>" has been upgraded. Happy Helming!
NAME: <release name>
LAST DEPLOYED: Wed Sep  7 09:26:31 2022
NAMESPACE: <namespace>
STATUS: deployed
REVISION: <revision number>
NOTES:
See the installed app by running these command:
kubectl get deployments -n <namespace>
Uninstalling Z4K
To uninstall Z4K you must first uninstall the ZKM-PX site and then uninstall the ZKM site:
Uninstall ZKM-PX
Get the release name:
➜>helm list -n <namespace>
NAME            NAMESPACE       REVISION        UPDATED                                 STATUS          CHART                   APP VERSION
<release name>  <namespace>     1               2022-09-07 09:16:04.896907435 +0300 IDT deployed        zkm-px-2.4.18+538       2.4.18+538


➜>helm uninstall <release name> -n <namespace>
Uninstall ZKM Site
- Verify that you're on the ZKM cluster.
- Use the following commands to get the release name and when use it to uninstall: